14 August 2016

Scratch Built RC Plane -Subsonic Drone v2 Plane Design

Subsonic Drone build logs:
Click here to see the Subsonic Drone v1. Also see the Micro Drone V3 for all the overall dimensions.

I designed the plane in SketchUp which is (formerly Google Sketchup) a 3D modeling computer program for a wide range of drawing applications such as architectural, interior design, landscape architecture, civil and mechanical engineering, film, and video game design—and available in a freeware version, SketchUp Make.


Completed! Getting ready to maiden. 


Let's start building it! 

12 June 2016

3D Printing - 3D Printed AA Battery Holder

One of my 3D printed things. More details and the 3D printing file are here.


3D printed battery holder

05 June 2016

02 February 2016

Done Registration - for the USA


According to FAA, people who previously operated their UAS must register by February 19, 2016. People who do not register could face civil and criminal penalties.

I don't like it but better be safe than sorry.

Here are the links to FAA for Done or Unmanned Aircraft Systems (UAS) registration.

https://www.faa.gov/uas/registration/

FAQs for the registration - https://www.faa.gov/uas/registration/faqs/

Here are some information about general rules for operating model aircraft.

https://www.faa.gov/uas/model_aircraft/

18 October 2015

FPV Goggle - Cheap Quanum

This is the most economical FPV Goggle I have seen so far. Only USD $29.99. It has a 4.3 inches screen with all parts included. Here is the link to the FPV Goggle.

FPV Goggle
FPV Goggle no Blue Screen


15 September 2015

Drone - 3D Printed Landing Gear Low Profile

This is my own 3D design. Printed, installed and tested.

You may download it here for free. My printer is PRUSA which I got it from Aliexpress.

Nighthawk 250
Nighthawk 250

07 September 2015

RepRap Prusa 3D Printer

I bought this 3D printer from Aliexpress. Here is the link and search 3d printer.

Brand Name: Sunhokey-S
Color Print Speed: 40-100 mm/s
Model Number: S-508
Structure Material: Full acylic and metal
Printing Filament: ABS PLA Nilon Kayu
Filament Diameter: 1.75mm
File Format: STL,G-Code
Z Axis Positioning Accuracy: 0.004mm
XY Axis Positioning Accuracy: 0.012mm
Type: Prusa i3
Extruder diameter: 0.4mm (customized 0.3mm/0.5mm)
Max Paper Size:200*200*180mm
Print Speed: 40-100 mm/s


3D Printing

07 May 2015

Drone 250 Hard Travel Case for $20

I bought this hard case for only $20.00.

  • Built-in O-ring with secure latches prevent water and moisture damage to contents
  • Padlock compatible for additional security
  • Built in pressure relief valve
  • High-density polymer provides outstanding strength and corrosion resistance
  • External dimensions (L x W x H): 18" x 14" x 7"
  • Approximate internal Dimensions (L x W x H): 17” x 11 ½” x 6”
QAV250 Quadcopter Hard Travel Case

01 March 2015

Chris Craft - 1949 Racing Runabout

This is a build logs for Chris Craft Racing Runabout manufactured by Dumas.

I won't talk about the obvious that are already in the building instruction, but I will post lots of pictures and learning from my building experience. 


Chris Craft Racing Runabout by Dumas
28" Chris Craft Racing Runabout
Chris Craft Racing Runabout by Dumas
28" Chris Craft Racing Runabout
Chris Craft Racing Runabout by Dumas
28" Chris Craft Racing Runabout
Chris Craft Racing Runabout by Dumas
28" Chris Craft Racing Runabout


Chris Craft Racing Runabout by Dumas
Frame - 28" Chris Craft Racing Runabout
Chris Craft Racing Runabout by Dumas
Frame - 28" Chris Craft Racing Runabout
Chris Craft Racing Runabout by Dumas
Frame - 28" Chris Craft Racing Runabout


Chris Craft Racing Runabout by Dumas
Frame - 28" Chris Craft Racing Runabout

15 February 2015

Drone - 250 Quadcopter Emax Nighthawk QAV

First, this QAV250 Quadcopter frame is not from Emax nor NightHawk . I used those names in the title is because people can search to this easier. I bought this from AliExpress. Here is the link to it and search for QAV 250.

I had the maiden flight, and it performed very well. Both the motors and ESCs got a little warm but acceptable. Not sure it was because of the props that drew too much current. Overall I am happy with the performance and the plastic motors.

To see how I made the Micro FPV setup click here.

Nighthawk QAV 250
EMAX Nighthawk QAV 250
Carbon Fiber QAV250 Frame Parts

08 November 2014

Drone - S500 Multicopter Build Log

Few photos of this quadcopter while it is being built.

S500 Frame Specs:
  • Motor centers: 480mm
  • Height: 170mm
  • Weight: 425g (frame only)
  • Motor Mount Bolt Holes: 16~19~25mm
Components:
The S500 is very easy to assemble. One thing that I don't really like is the landing legs. They are a bit unstable.


03 November 2014

MultiWii GPS with I2C Setup


For the GPS
  1. Download UBLOX program here. Then  
  2. Download the I2C_GPS_NAV v2.2 from here.
  3. Copy the u-blox-config-ublox txt file to somewhere in your computer.

01 March 2014

MultiWii Brushless Gimbal - GoPro

This 2-axle brushless gimbal is designed for GoPro.

  1. First, download the FTDI Driver is here. This will let you connect the controller board to your computer for uploading the controller firmware.
  2. Then you need to download the firmware here. Select the latest BruGi zip file.
  3. In the BruGi file, you will upload/flash the controller firmware using the IMU.ino file. The Graphic User Interface (GUI) is also in the zip file. The GUI is used for configure and adjust all the PID settings.


30 December 2013

FPV Micro 5.8 GHz Video Transmitter

Building a Micro FPV pod.
Part list: 

09 December 2013

MINI MWC Flight Control Board and DSM2 - Upload MultiWii into the Board

Some instructions for flashing/uploading/writing the MultiWii program/sketch to a Mini (MultiWii Control) MWC Flight Control Board to a computer. Here is the link to where I bought everything for this work.

This instruction should work with other Wii Motion Plus and a Arduino pro mini board.

First you need to download the following applications into your computer. You need to connect your board to your computer. Here are another posts for how to connect the board to a computer and how to calibrate ESC with MultiWii program.
  1. You need to download the MultiWii program. Here is the link to download. The MultiWii program is in the MultiWii unzipped file. The other MultiWiiConf file has the GUI application for you to adjust and confirm your board settings and configurations.
  2. Arduino application, that is used for setting up and editing the MultiWii program/sketch, will be used for flashing/uploading the program into the board. Here is the link to download. Choose the Arduino IDE and select the one fits your computer to download.
  3. Here are a few editing that I did to the sketch in the congf.h tap. I have a Quadcopter X type, I use this as an example for everyone.
    • Uncomment --- #define QUADX
    • Uncomment --- #define HK_MultiWii_SE_V2 ..... this is for HK Mini MWC board.
    • Uncomment --- #define SERIAL_SUM_PPM .... please select the one match your TX brand.
  4. Next, you need to select the Board Type and Serial Port under Tools.
  5. Last is to save, compile and then upload.
Below are the things to watch out:

08 December 2013

MultiWii ESC Calibration

This video will show you how to use MultiWii program feature """#define ESC_CALIB_CANNOT_FLY """ to calibrate all the ESC at once.

Things to watch out:
  • No need to switch on your TX.
  • Disconnect the board from computer
  • No props attached
  • Once the calibration is completed, comment the #define ESC_CALIB_CANNOT_FLY and re-upload the MultiWii program to the board.
See also how to connect the board to a computer.
and Upload and Configure MultiWii program.


07 December 2013

Defect problem --- Hobby King Mini MWC Flight Control Board and DSM2

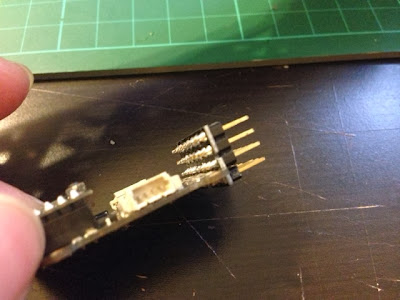
Incomplete soldering causes the board not able to communicate with ESC's. This causes me to spend so much time on troubleshoot ESC calibrations. I thought that the MultiWii program setup and parameter settings were the issues. It ended up the board defect.

The entire 3rd row of the ESC pins (signal pin) didn't solder to the board. See the arrow shown on the picture below.

Defect problem --- Mini MWC Flight Control Board and DSM2
Red arrow pointing the row of signal pins have not solder to the board.

Defect problem --- Mini MWC Flight Control Board and DSM2


Defect problem --- Mini MWC Flight Control Board and DSM2

More pictures below

20 November 2013

MINI MWC Flight Control Board and DSM2 - Connecting to Computer

Some instructions for connecting Mini (MultiWii Control) MWC Flight Control Board to a computer.

The device at the top of picture below is the board . Bought it from HobbyKing. Here is the link.
You might so able to find it here for cheaper price with same quality.


The one at the bottom of the picture is FTDI which is used for connecting the Control Board to computer. As you can see it has an USB on the left.

The FTDI is used for connecting the board to your computer so that you can configure and trim the board controls settings via GUI software, and flash other multicopter firmware into the board via Arduino software.

See how to calibrate the ESCs
and how to upload and configure MultiWii program


Here is a mini micro 4 pin 1.25 T-1 JST connector cable for connecting between the Control Board and the FTDI.


If you look closer in the picture below, you can see pin to pin connections. I have green as ground, yellow as 5V or power (PWR), black as RXD (board side) or TXO (FTDI side), and red as TXD (board side) or RXI (FTDI side).